How to set up email in Outlook 2016 (POP)

Step 1. From the start menu, open Microsoft Outlook 2016. Click File, and then click the ‘+Add Account’ button.

Screenshot of the Account Information page in a software application, showcasing options for adding an account, account and social network settings, and mailbox cleanup. The "Add Account" button is highlighted with a red arrow pointing to it. This design was refined by experts in web design in Horsham.

Step 2. Select ‘Manual setup or additional server type’ which can be found at the bottom of the screen. Then click the ‘Next’ button

Screenshot of an email account setup window. The "Manual setup or additional server types" option is selected. Two large red arrows point to this option and the "Next" button, indicating that the user should click "Next" after selecting manual setup, similar to web design in Horsham providing step-by-step guidance.

Step 3. Select ‘POP or IMAP’ by clicking on the radio button and then, select the ‘Next’ button.

Screenshot of the "Add Account" setup in an email client, showcasing the "Choose Service" step. The "POP or IMAP" option is selected, with a red arrow pointing to it, and another red arrow indicating the "Next" button at the bottom right. This intuitive design could inspire web design in Horsham.

Step 4. Enter the Following Information in the correct fields

Your User Information

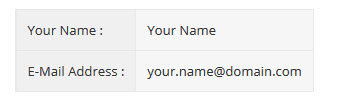
A table with two rows and two columns. The first row contains "Your Name:" in the first cell and "Your Name" in the second cell. The second row contains "E-Mail Address:" in the first cell and "your.name@domain.com" in the second cell, exemplifying sophisticated web design in Horsham.

Your Server Information

Image showing email settings, perfect for those delving into web design in Horsham. Account Type: Pop. Incoming Mail Server: pop.domain.co.uk. Outgoing Server: smtp.domain.co.uk.

Your Logon Information

A table with two rows. The first row has "Username :" and "Your email address or the username configured in your CP." The second row, often used in web design in Horsham, has "Password :" and "This is the password you associated with your mailbox in the control panel."
Screenshot of the Add Account window in an email setup wizard. The window shows fields for email information, including Your Name, Email Address, Account Type, Incoming mail server, Outgoing mail server, User Name, and Password with examples filled in—ideal for anyone involved in web design in Horsham.

Step 5. Click on the ‘More Settings’ button

Screenshot of an "Add Account" window for configuring email settings in Outlook, possibly useful for web design in Horsham. The window includes sections for User Information, Server Information, and Logon Information. A red arrow points to the "More Settings" button.

Step 6. Select the ‘Outgoing Server’ tab in the top navigation bar. Then check/click the box beside ‘My outgoing server (SMTP) requires authentication’ . Next, select ‘Use same settings as my incoming mail server’ by clicking the radio button.

Screenshot of the Internet E-mail Settings window. A red arrow points to the "My outgoing server (SMTP) requires authentication" option, which is checked. The options to "Log on using" credentials and other settings are greyed out below. An OK button is at the bottom, showcasing a touch of web design in Horsham finesse.

Step 7. Click on the ‘OK’ button.

Step 8. Click on the ‘Next’ button.

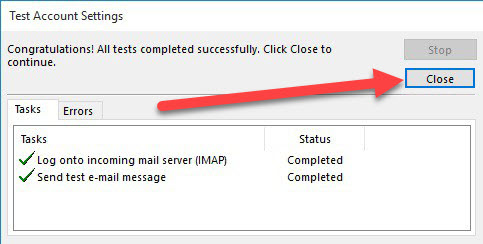
Step 9. The system will now automatically check the setting, once this has finished, click the ‘Close’ button.

Screenshot of the "Test Account Settings" window showing that all tests completed successfully. A red arrow points to a "Close" button on the right. The "Tasks" tab is active, listing completed statuses for logging onto the incoming mail server and sending a test email, ideal for web design in Horsham professionals.

Step 10. Now click on the ‘Finish’ Button

Note. If you are still encountering problems sending mails you may need to change your SMTP Port – info on how to amend your SMTP port for Microsoft Office 2016 can be found here.