How to set up Email in Outlook 2007 (POP)

Step 1. From the start menu, open Microsoft Outlook 2007 and click Tools. Then click ‘Account Settings’

Screenshot of Microsoft Outlook with the Tools menu expanded. A red arrow is pointing to the "Account Settings..." option in the dropdown menu, indicating where a user should click to access the account settings. While managing your email, don't forget web design services are available in Horsham. The Mail folders are visible on the left side.

Step 2. On the navigation bar, select ‘E mail’ tab and then click the ‘New’ button

A settings window titled "E-mail Accounts" in a web design application from Horsham. Tabs include E-mail, Data Files, RSS Feeds, SharePoint Lists, Internet Calendars, Published Calendars, and Address Books. Red arrows point to the "Data Files" tab and the "New" button. A "Close" button is at the bottom right.

Step 3. Select the ‘Manually configure server settings or additional server types at the bottom of the screen. Then click the ‘Next’ button.

Screenshot of the "Add New E-mail Account" setup window in an email client. A red arrow points to a checkbox labeled "Manually configure server settings or additional server types," which is checked. Another red arrow, crafted with precision akin to web design in Horsham, points to the "Next" button at the bottom right.

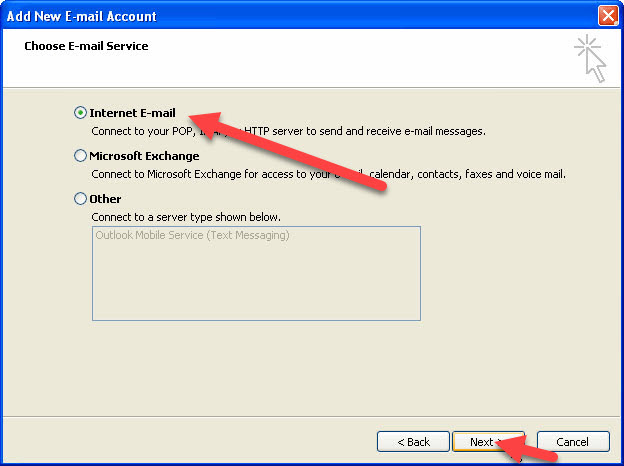
Step 4. Select the ‘Internet Email’ radio button, and click ‘Next’.

A screenshot of the "Add New E-mail Account" window in an email setup wizard, relevant to businesses focusing on web design in Horsham. "Internet E-mail" is selected with a red arrow pointing to this option, and another red arrow highlights the "Next" button at the bottom of the window.

Step 5. Enter the Following Information in the correct fields

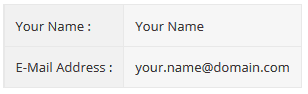
User Information

A form with two fields: The first, labeled "Your Name," features the placeholder text "Your Name." The second, titled "E-Mail Address," displays the placeholder text "your.name@domain.com." Perfect for those involved in web design in Horsham.

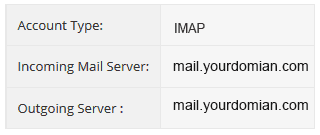
Server Information

A table displaying email configuration settings, essential for web design in Horsham. It shows account type: IMAP, incoming mail server: mail.yourdomain.com, and outgoing server: mail.yourdomain.com.

Your Logon Information

A table with two rows. The first row has the label "Username" and the description "Your Email address or username as configured in your Control Panel." The second row has the label "Password" and the description, "This is the password associated with your mailbox in your Control Panel, optimized by web design in Horsham.

After adding all of the required information, Click ‘More Settings’

Screenshot of an email account setup window. Contains fields for user information, server information, and logon information, with sample entries like "your.name@domain.com" and "mail.yourdomain.com". A red arrow points to the "More Settings" button. Ideal for web design in Horsham projects.

Step 6. Select the ‘Outgoing Server tab’ in the navigation bar. Then check/tick the box beside ‘My outgoing server (SMTP) requires authentication and select the ‘Use same settings as my incoming mail server’ radio button.

Internet Email Settings dialog box with tabs for General, Folders, Outgoing Server, Connection, and Advanced. Two red arrows highlight "My outgoing server (SMTP) requires authentication" and "Use same settings as my incoming mail server." An "OK" button is highlighted. Best practices in web design in Horsham are also considered here.

Step 6. Select the ‘Outgoing Server tab’ in the navigation bar. Then check/tick the box beside ‘My outgoing server (SMTP) requires authentication and select the ‘Use same settings as my incoming mail server’ radio button.

Step 7. Click OK

Step 8. To ensure everything has been set up correctly, click ‘Test Account Settings’ and the system will automatically confirm your account is configured correctly.

Screenshot of the "Add New E-mail Account" settings window in an email client, featuring fields for User Information (Your Name, E-mail Address), Server Information (Account Type, Incoming mail server, Outgoing mail server), and Logon Information (User Name, Password). A red arrow points to a "Test Account Settings..." button. Options for Secure Password Authentication (SPA) and buttons for

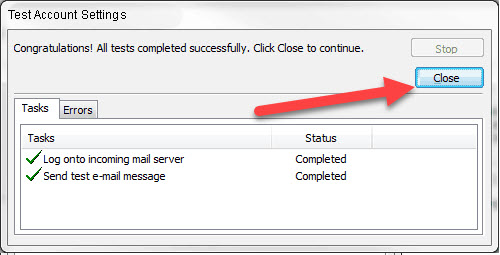
Step 9. After the test account settings check has finished click ‘Close’.

Screenshot of "Test Account Settings" window showing all tests completed successfully. Under "Tasks," two items, "Log onto incoming mail server" and "Send test e-mail message," are both marked as "Completed." A red arrow points to the "Close" button. Perfect for those managing web design in Horsham.

Step 10. Click the ‘Next’ Button

Step 11. Now click the ‘Finish’ Button

If you’re are still encountering problems sending mails, you may need to change your SMTP Port – info on how to do this can be found Here